Die GTK 3.12 ActionBar in Vala
Auch wenn es die Gtk.ActionBar schon seit GTK 3.12 und somit schon ein bisschen länger gibt, habe ich bisher kaum Anleitungen dazu im Internet gefunden und keine einzige für Vala. Daher möchte ich hiermit ein kleines Tutorial nachliefern, auch wenn sich die Verwendung eigentlich nicht sonderlich von einer Gtk.Box oder einer Gtk.Toolbar unterscheidet.
ActionBars sind eigentlich wie eine Toolbar, nur sollen sie kontextsensitiv verwendet werden und sich unter dem Widget befinden, für das sie zuständig sind. Die Unterschiede sind also eher semantisch. Die Benutzung erinnert stark an eine Gtk.Box mit horizontaler Ausrichtung, es werden also mit pack_start () Gtk.Widgets an den linken Rand gesetzt, mit pack_end () an den rechten. Zusätzlich kann aber noch ein Gtk.Widget mit set_center_widget () mittig in die Gtk.ActionBar gesetzt werden, wobei mittig absolut gemeint ist, also unabhängig von Anzahl und Größe der Gtk.Widgets an den Seiten. Sollen in der Mitte mehrere Gtk.Widgets platziert werden, müssen diese vorher in einen Gtk.Container gepackt werden, also zum Beispiel in eine Gtk.Box.
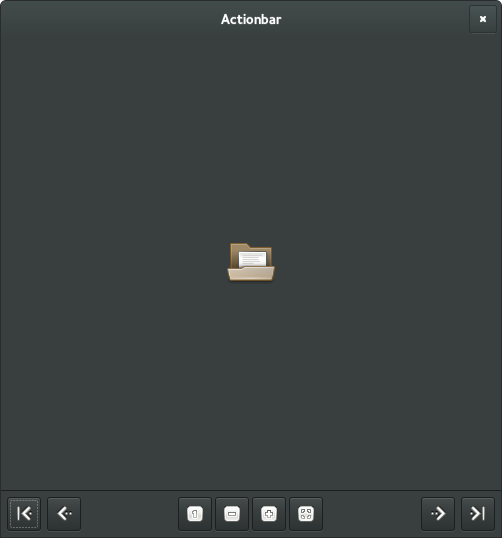
So habe ich es auch in meiner obligatorischen kleinen Beispielanwendung gemacht, die als Grundlage für einen minimalistischen Bildbetrachter fungieren könnte. Natürlich fehlt noch jegliche Logik im Beispiel, aber hier soll es ja auch nur um die Benutzung der Gtk.ActionBar gehen. Eingebaut habe ich das ganze wie immer in eine Gtk.Application.
class Example : Gtk.Application {
	public Example () {
		Object (application_id: "com.example.app", flags: ApplicationFlags.FLAGS_NONE);
	}

	protected override void activate () {
		Gtk.Settings.get_default ().gtk_application_prefer_dark_theme = true;
		Gtk.ApplicationWindow window = new Gtk.ApplicationWindow (this);
		window.set_default_size (500, 500);
		window.set_title ("Actionbar");

		/*
		 * Primäre Box
		 */
		Gtk.Box primary_box = new Gtk.Box (Gtk.Orientation.VERTICAL, 0);

		/*
		 * Als Beispiel ein Bild
		 */
		Gtk.Image image = new Gtk.Image.from_icon_name ("document-open", Gtk.IconSize.DIALOG);
		primary_box.pack_start (image);

		/*
		 * Ab hier Actionbar
		 */
		Gtk.ActionBar action_bar = new Gtk.ActionBar ();

		// Linke Buttons
		Gtk.Button left_button1 = new Gtk.Button.from_icon_name ("go-first", Gtk.IconSize.SMALL_TOOLBAR);
		action_bar.pack_start (left_button1);
		Gtk.Button left_button2 = new Gtk.Button.from_icon_name ("go-previous", Gtk.IconSize.SMALL_TOOLBAR);
		action_bar.pack_start (left_button2);

		// Rechte Buttons
		Gtk.Button right_button1 = new Gtk.Button.from_icon_name ("go-last", Gtk.IconSize.SMALL_TOOLBAR);
		action_bar.pack_end (right_button1);
		Gtk.Button right_button2 = new Gtk.Button.from_icon_name ("go-next", Gtk.IconSize.SMALL_TOOLBAR);
		action_bar.pack_end (right_button2);

		// Mittlere Buttons
		Gtk.Box secondary_box = new Gtk.Box (Gtk.Orientation.HORIZONTAL, 3);

		Gtk.Button center_button1 = new Gtk.Button.from_icon_name ("zoom-original", Gtk.IconSize.SMALL_TOOLBAR);
		secondary_box.pack_start (center_button1);
		Gtk.Button center_button2 = new Gtk.Button.from_icon_name ("zoom-out", Gtk.IconSize.SMALL_TOOLBAR);
		secondary_box.pack_start (center_button2);
		Gtk.Button center_button3 = new Gtk.Button.from_icon_name ("zoom-in", Gtk.IconSize.SMALL_TOOLBAR);
		secondary_box.pack_start (center_button3);
		Gtk.Button center_button4 = new Gtk.Button.from_icon_name ("zoom-fit-best", Gtk.IconSize.SMALL_TOOLBAR);
		secondary_box.pack_start (center_button4);

		action_bar.set_center_widget (secondary_box);


		primary_box.pack_end (action_bar, false);

		window.add (primary_box);
		window.show_all ();
	}
}

int main (string[] args) {
	return new Example ().run (args);
}
Einfach als actionbar.vala abspeichern und wie immer mit
valac --pkg gtk+-3.0 -o actionbar actionbar.valakompilieren. Ich hoffe, ich konnte denjenigen unter euch, denen das Nachlesen im Valadoc manchmal nicht reicht, ein bisschen helfen, und wünsche viel Spaß mit den ActionBars!